예시

abstract class Component {
    abstract fun operate(): String
}

class ConcreteComponent : Component() {
    override fun operate(): String {
        return "This is ConcreteComponent"
    }
}

abstract class Decorator(val component: Component) : Component() {
    abstract override fun operate(): String
}

class ConcreteDecorator(component: Component) : Decorator(component) {

    override fun operate(): String {
        return component.operate() + "with ConcreteDecorator"
    }
}
- Client
fun main() {
    var concreteComponent: Component = ConcreteComponent()

    concreteComponent = ConcreteDecorator(concreteComponent)
    concreteComponent = ConcreteDecorator(concreteComponent)
    concreteComponent.operate()
}
개념
데코레이터 패턴은 이 객체를 사용하는 코드를 변경하지 않으면서 객체에 추가행동을 더해줄 수 있는 방법이다. 상속보다 유연하게 사용할 수 있다.
- Component → 기본이 되는 개념 (음료)
- ConcreteComponent → 개념을 구현한 구현체 (에스프레소)
- Decorator → 장식의 틀
- DecoratorComponent → 구현체의 장식 (우유, 휘핑크림)
비유
카페

- Component → 음료
- ConcreteComponent → 에스프레소, 하우스 블렌드, 다크 로스트
- DecoratorComponent → 모카, 우유, 두유, 휘핑
abstract class Beverage {
    var description = "제목 없음"
    abstract fun cost(): Double
}

class Espresso : Beverage() {
    init {
        description = "에스프레소"
    }

    override fun cost(): Double {
        return 1.99
    }
}

class HouseBlend : Beverage() {
    init {
        description = "하우스 블렌드"
    }

    override fun cost(): Double {
        return 0.89
    }
}

abstract class CondimentDecorator(val beverage: Beverage) : Beverage() {
    abstract fun getDescription(): String
}

class Mocha(beverage: Beverage) : CondimentDecorator(beverage) {
    override fun getDescription(): String {
        return "${beverage.description}, 모카"
    }

    override fun cost(): Double {
        return beverage.cost() + 0.20
    }
}

class Whip(beverage: Beverage) : CondimentDecorator(beverage) {
    override fun getDescription(): String {
        return "${beverage.description}, 휘핑"
    }

    override fun cost(): Double {
        return beverage.cost() + 0.15
    }
}
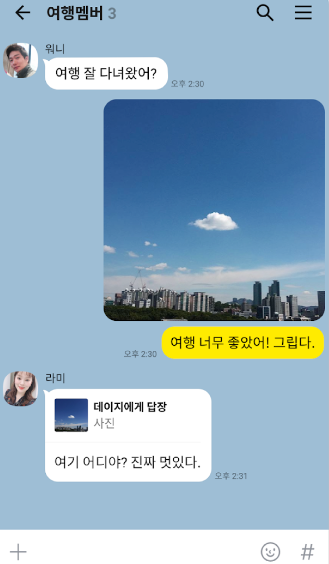
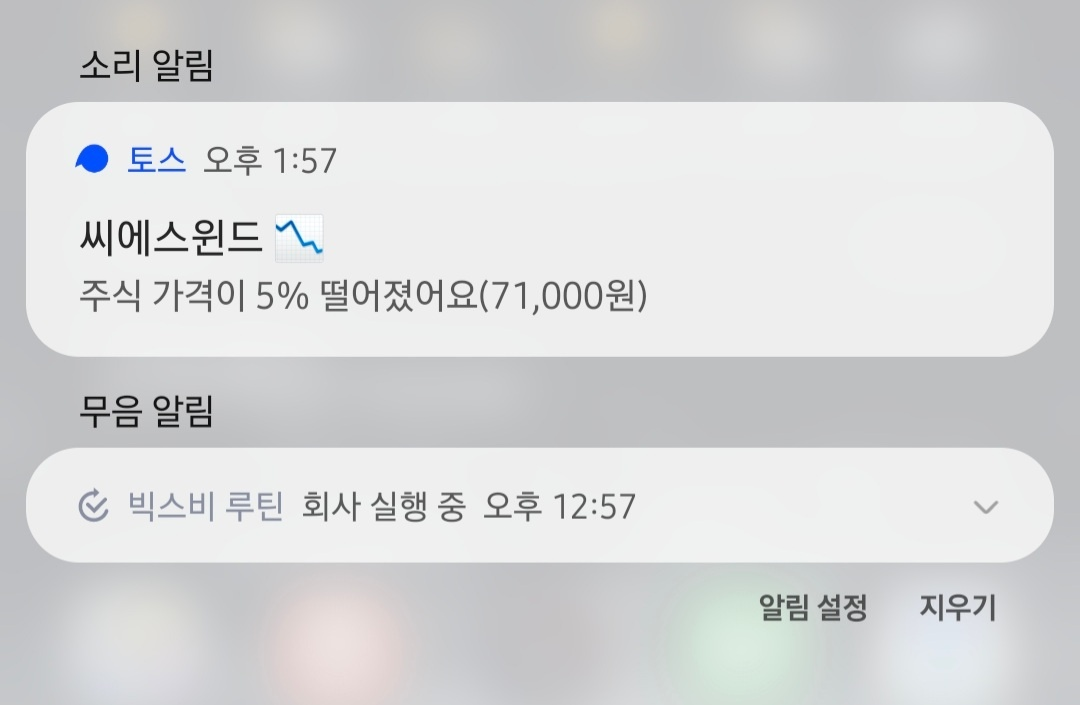
안드로이드 Notification
- Comonent → 알림
- ConcreteComponent → 아이콘, 제목, 내용,
PendingIntent등이 지정되어있는 기본 Notification
- DecoratorComponent → LagreIcon, BigPictureStyle 등등
abstract class NotificationComponent { lateinit var notificationBuilder: NotificationCompat.Builder fun build() : Notification { return notificationBuilder.build() } abstract fun createNotificationBuilder( context: Context, pendingIntent: PendingIntent, title: String, body: String, channelId: String ): NotificationCompat.Builder } class BaseNotification: NotificationComponent() { override fun createNotificationBuilder( context: Context, pendingIntent: PendingIntent, title: String, body: String, channelId: String ): NotificationCompat.Builder { notificationBuilder = NotificationCompat.Builder(context, channelId) .setSmallIcon(R.drawable.ic_launcher_transparent) .setColor(ContextCompat.getColor(context, R.color.icon_color)) .setContentTitle(title) .setContentText(body) .setContentIntent(pendingIntent) .setAutoCancel(true) .setPriority(NotificationCompat.PRIORITY_HIGH) .setDefaults(NotificationCompat.DEFAULT_ALL) return notificationBuilder } } abstract class NotificationDecorator(val component: NotificationComponent): NotificationComponent() class LargeIconDecorator(component: NotificationComponent, private val largeIcon:Bitmap) : NotificationDecorator(component) { override fun createNotificationBuilder( context: Context, pendingIntent: PendingIntent, title: String, body: String, channelId: String ): NotificationCompat.Builder { notificationBuilder = component.createNotificationBuilder(context, pendingIntent, title, body, channelId) .setLargeIcon(largeIcon) return notificationBuilder } } class BigPictureDecorator(component: NotificationComponent, private val image: Bitmap) : NotificationDecorator(component) { override fun createNotificationBuilder( context: Context, pendingIntent: PendingIntent, title: String, body: String, channelId: String ): NotificationCompat.Builder { val bigPictureStyle = NotificationCompat.BigPictureStyle().also { it.setBigContentTitle(title) it.setSummaryText(body) it.bigPicture(image) } notificationBuilder = component.createNotificationBuilder(context, pendingIntent, title, body, channelId) .setStyle(bigPictureStyle) return notificationBuilder } }- 실제로 동작하는 코드입니다.
- Caller 부분
- Java
NotificationComponent notification = new BaseNotification(); notification = new LargeIconDecorator(notification, image); notification = new BigPictureDecorator(notification, image); notification.createNotificationBuilder(this, pendingIntent, title, body, CHANNEL_ID); notificationManager.notify(CHAT_NOTIFICATION_ID, notification.build());- Kotlin
var notification: NotificationComponent = BaseNotification()
notification = LargeIconDecorator(notification, image)
notification = BigPictureDecorator(notification, image)
notification.createNotificationBuilder(this, pendingIntent, title, body, CHANNEL_ID)

notificationManager.notify(CHAT_NOTIFICATION_ID, notification.build())
장단점
장점
- 서브클래스를 새로 만들지 않아도 객체의 행동을 추가할 수 있다.
- 런타임에 행동을 추가할 수 있다.
- SRP
- 각 ConcreteDecorator가 하나의 책임을 가진다.
단점
- 특정 데코레이터를 제거하기 어렵다.
- 데코레이터의 순서에 의존한다.

출처
https://refactoring.guru/ko/design-patterns/decorator
Uploaded by N2T
'Programming > 디자인패턴' 카테고리의 다른 글
| [Kotlin] Command Pattern 예시코드 - 코틀린으로 쓴 디자인 패턴 (0) | 2023.04.17 |
|---|---|
| [Kotlin] Singleton Pattern 예시코드 - 코틀린으로 쓴 디자인 패턴 (0) | 2023.04.17 |
| [Kotlin] Factory Pattern 예시코드 - 코틀린으로 쓴 디자인 패턴 (0) | 2023.04.06 |
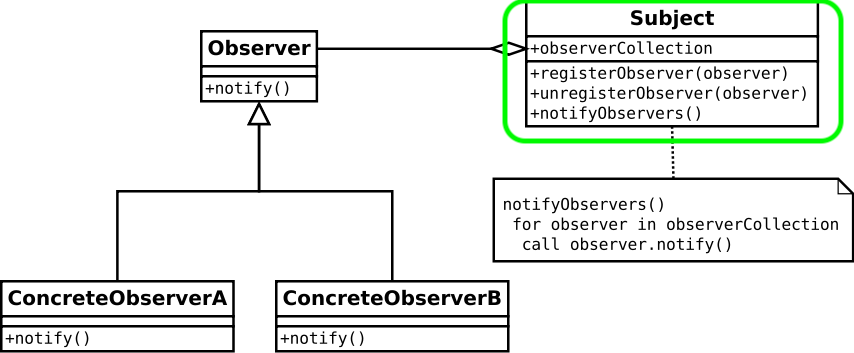
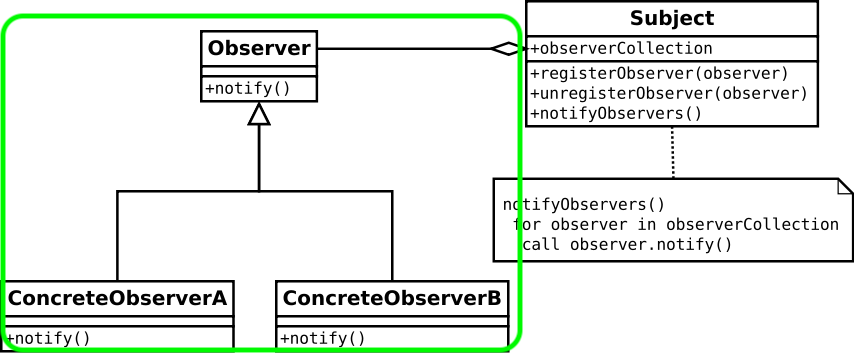
| [Kotlin] Observer Pattern 예시코드 - 코틀린으로 쓴 디자인 패턴 (0) | 2023.04.05 |
| [Kotlin] Strategy Pattern 예시코드 - 코틀린으로 쓴 디자인 패턴 (0) | 2023.04.05 |


