예시

// Invoker
class Switch(private val flipUpCommand: Command, private val flipDownCommand: Command) {
    fun flipUp() {
        flipUpCommand.execute()
    }

    fun flipDown() {
        flipDownCommand.execute()
    }
}

// Receiver
class Light {
    fun turnOn() {
        println("The light is on")
    }

    fun turnOff() {
        println("The light is off")
    }
}

// Command
interface Command {
    fun execute()
}

class TurnOnLightCommand(private val theLight: Light) : Command {
    override fun execute() {
        theLight.turnOn()
    }
}

class TurnOffLightCommand(private val theLight: Light) : Command {
    override fun execute() {
        theLight.turnOff()
    }
}

// Client
fun main(args: Array<String>) {
    val light = Light()
    val switchUp: Command = TurnOnLightCommand(light)
    val switchDown: Command = TurnOffLightCommand(light)
    val s = Switch(switchUp, switchDown)
    s.flipUp()
    s.flipDown()
}

개념

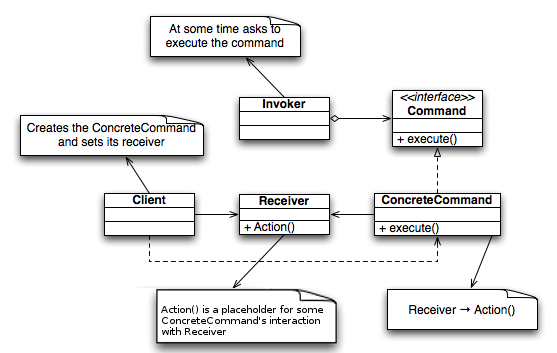
커맨드 패턴은 사용자의 요청을 요청에 대한 모든 정보가 포함된 객체로 캡슐화하는 디자인 패턴이다. 요청의 처리를 지연하거나 대기열에 넣거나, 실행취소할 수 있는 작업들을 지원한다.
  • 커맨드 패턴은 4가지로 구성된다.
    1. Command
      • 인터페이스로, 특정 동작을 실행하기 위한 단일 메소드만 선언한다.
      • 구현체에서 특정 동작들을 구현한다.
    1. Receiver
      • 요청을 수행한다.
    1. Invoker
      • 요청을 Receiver에게 보낸다. 단, 직접 보내지 않고 커맨드를 작동시킨다.
    1. Client
      • 커맨드 구현체를 만든다.
      • 각각의 커맨드에 Receiver를 설정해주고, 만들어진 커맨드를 Invoker에게 알려준다.

콜백의 대안으로 사용되며 작업 대기, 작업 기록 추적에도 사용된다.

장단점

장점

  • SRP
    • 작업 호출과 수행을 분리
  • OCP
    • 새로운 커맨드 추가
  • undo/redo 구현
  • 지연된 실행 구현
  • 간단한 커맨드의 조함으로 복잡한 동작 가능

단점

  • Invoker와 Receiver사이에 layer가 추가되기 때문에 코드가 복잡해진다.

출처

https://refactoring.guru/ko/design-patterns/command

https://ko.wikipedia.org/wiki/커맨드_패턴


Uploaded by N2T

개념

싱글톤 패턴이란 클래스의 인스턴스가 하나만 있도록 하면서 이 인스턴스에 대해 Global Access Point를 제공하는 디자인 패턴이다.

  • 싱글톤 패턴은 인스턴스를 하나만 생성하기 때문에 인스턴스를 여러개 생성하는 것보다 메모리 사용에서 이점이 있다.
    • 생성 방식에 따라, 사용하지 않는데 인스턴스를 만들 수도 있기 때문에 메모리 낭비가 발생할 수도 있다.
  • 다른 클래스 간의 데이터 공유가 쉽지만, 동시성 문제가 발생할 수 있다.
  • 싱글톤의 구현 방법은 아래와 같이 여러가지가 존재한다.
    1. Eager Initialization
    1. Lazy Initialization
    1. Thread Safe Lazy Initialization
    1. Double-Checked locking
    1. Initialization on demand holder idiom

코틀린에서는 object 키워드를 사용하면 싱글톤 클래스를 만들 수 있다.

예시

1. Eager Initialization

class Singleton private constructor() {

    companion object {
        private var INSTANCE: Singleton = Singleton()

        fun getInstance(): Singleton {
            return INSTANCE
        }
    }
}

2. Lazy Initialization

class Singleton private constructor() {

    companion object {
        private var INSTANCE: Singleton? = null

        fun getInstance(): Singleton {

            return INSTANCE ?: Singleton().apply {
                INSTANCE = this
            }
        }
    }
}

3. Thread Safe Lazy Initialization

Kotlin의 object 로 선언하면 thread-safe하다.

class Singleton private constructor() {

    companion object {
        private var INSTANCE: Singleton? = null

				@Synchronized
        fun getInstance(): Singleton {
            return INSTANCE ?: Singleton().apply {
                INSTANCE = this
            }
        }
    }
}

4. Double-check locking

class Singleton private constructor() {

		companion object {
				@Volatile private var INSTANCE: Singleton? = null

				fun getInstance() = INSTANCE ?: synchronized(this) {
						INSTANCE ?: Singleton().apply { INSTANCE = this }
				}
		}
}
				
  • 인스턴스 생성 작업만 synchronized로 블럭킹 하는 방법이다.
  • 메소드에 synchronized를 하게되면 호출이 많을 수록 성능이 떨어진다.

5. Initialization on demand holder idiom

자바 코드

public class Something {
    private Something() {}

    private static class LazyHolder {
        static final Something INSTANCE = new Something();
    }

    public static Something getInstance() {
        return LazyHolder.INSTANCE;
    }
}
  • JVM에서 Static Inner Class는 실행되는 시점에 초기화된다.
  • 또한 클래스 초기화는 순차적으로 일어나는 것을 보장하기 때문에 동시성 문제가 발생하지 않는다.

코틀린으로 한다면 이런 느낌일 거 같다.

class Singleton private constructor() {
    companion object {
        class LazyHolder private constructor() {
            companion object {
                var INSTANCE = Singleton()
            }
        }
        fun getInstance() = LazyHolder.INSTANCE
		}
}

장단점

장점

  • 클래스의 인스턴스를 하나만 가진다.
  • Global Access Point를 얻는다.
  • 필요한 시점(처음 호출되는)에 초기화 한다.

단점

  • SRP(단일 책임 원칙)위반
    1. 클래스에 인스턴스가 하나만 있도록 함
    1. 해당 인스턴스에 대한 Global Access Point 제공
    • 위 두가지 책임을 동시에 가지고 있다.
  • 다중 스레드 환경에서 동시성 문제가 발생할 수 있다.
    • 여러 쓰레드가 동시에 싱글톤 객체를 생성하여 인스턴스가 여러 개 생길 수도 있다.
  • 유닛 테스트가 어렵다.
    • Mock 객체를 만들 때 상속을 이용하는데 싱글턴은 상속을 할 수 없기 때문


Uploaded by N2T

  • 팩토리 패턴은 크게 3가지 정도가 있다.
    • Simple Factory (엄밀히 말하면 패턴은 아니다)
    • Factory Method Pattern
    • Abstract Method Pattern

Simple Factory

엄밀히 말하면 패턴은 아니다. 프로그래밍에서 자주 쓰이는 관용구 정도의 방식이다.

상황

  • 피자 가게에 주문을 받고, 피자를 만드는 시스템이 있다.
  • 피자의 종류에 상관없이 피자를 굽고, 자르고, 포장하는 과정은 모두 똑같다.
  • 주문에 따라 피자의 종류만 달라진다.
class PizzaStore(val factory: SimplePizzaFactory) {
    fun orderPizza(type: String): Pizza {
        val pizza = factory.createPizza(type)

        pizza.prepare()
        pizza.bake()
        pizza.cut()
        pizza.box()

        return pizza
    }
}

class SimplePizzaFactory {
    fun createPizza(type: String): Pizza {
        if (type == "chicago") {
            return ChicagoPizza()
        } else {
            return CheesePizza()
        }
    }
}

interface Pizza {
    fun prepare()
    fun bake()
    fun cut()
    fun box()
}

class CheesePizza : Pizza {
    override fun prepare() {
        // 재료준비
    }
    override fun bake() {
        // 굽기
    }
    override fun cut() {
        // 자르기
    }
    override fun box() {
        // 포장하기
    }
}

class ChicagoPizza : Pizza {
    override fun prepare() {
        // 재료준비
    }
    override fun bake() {
        // 굽기
    }
    override fun cut() {
        // 자르기
    }
    override fun box() {
        // 포장하기
    }
}
  • 인스턴스를 생성하는 역할을 팩토리 클래스에 위임했다.
    • 피자 종류가 추가되어도 PizzaStore를 변경하지 않아도 된다.

Factory Method Pattern

팩토리 메소드 패턴은 슈퍼 클래스에 객체를 생성할 때 필요한 인터페이스를 만든다. 어떤 클래스의 인스턴스를 만들지는 서브 클래스에게 맡기는 것이다.
  • Creator(슈퍼 클래스)는 사용할 객체를 만드는 메소드를 가지고 있다.
    • Product를 반환받아 작업을 할 뿐이다. Product가 무엇인지는 모른다.
    • ex) 라인 조립을 한다고 하자. 나사들 가져와서 임팩트 드릴로 박아야한다.
      • 라인 작업자가 해야할 일
        1. 나사를 만들어주세요.
        1. 나사를 조립한다.
      • 라인 작업자는 나사의 재질이 무엇이고 어느 공장에서 만들어진건지 알 필요가 없다.

상황

Simple Factory 패턴에 이어서, 이제 피자 가게를 확장하기로 했다.

피자를 만드는 과정은 똑같지만, 피자에는 지역 색이 들어간다.

K-Pizza, Italian Pizza, Chicago Pizza, Newyork Pizza …

기존의 방식을 써볼까?

  • 한 공장에서 너무 많은 피자를 만든다.

바꿔보자

package design_pattern

abstract class PizzaStore {
    fun orderPizza(type: String): Pizza {
        val pizza = createPizza(type)

        pizza.prepare()
        pizza.bake()
        pizza.cut()
        pizza.box()

        return pizza
    }

    abstract fun createPizza(type: String): Pizza
}

class KoreanPizzaStore : PizzaStore() {
    override fun createPizza(type: String): Pizza? {
        return when(type) {
            "cheese" -> KoreanStyleCheesePizza()
            "pepperoni" -> KoreanStylePepperoniPizza()
            "combination" -> KoreanStyleCombinationPizza()
            "potato" -> KoreanStylePotatoPizza()
            else -> null
        }
    }
}

class NYPizzaStore : PizzaStore() {
    override fun createPizza(type: String): Pizza? {
        return when(type) {
            "cheese" -> NYStyleCheesePizza()
            "pepperoni" -> NYStylePepperoniPizza()
            "combination" -> NYStyleCombinationPizza()
            "potato" -> NYStylePotatoPizza()
            else -> null
        }
    }
}

interface Pizza {
    fun prepare()
    fun bake()
    fun cut()
    fun box()
}

class NYStylePotatoPizza : Pizza {

}

class NYStyleCombinationPizza : Pizza {
    // 생략
}

class NYStylePepperoniPizza : Pizza {
    // 생략
}

class NYStyleCheesePizza : Pizza {
    // 생략
}

class KoreanStylePotatoPizza : Pizza {
    // 생략
}

class KoreanStyleCombinationPizza : Pizza {
    // 생략
}

class KoreanStylePepperoniPizza : Pizza {
    // 생략
}

class KoreanStyleCheesePizza : Pizza {
    // 생략
}
  • 실제로 클라이언트가 스토어 구현체에 주문하는 것은 아니지만, 무슨 피자를 만들 것인지는 구현체(서브클래스)에 정의되어 있기 때문에 이렇게 그려봤다.
  • 이렇게 그리는게 맞을 거 같다.

Abstract Factory Pattern

추상 팩토리 패턴은 구현 클래스에 의존하지 않고, 서로 연관되거나 의존적인 객체로 이루어진 제품군(Family)을 생산하는 인터페이스를 제공하는 패턴이다.

  • 사용자는 추상적인 Product만 알고 사용한다. 실제로 어떤 것인지는 상관없다. (팩토리 메소드 패턴도 동일)
  • 팩토리를 통해 반환받은 Product만 사용한다.
  • 사용하는 방법은 똑같기 때문에, Mac에서 노션을 쓰든, Windows에서 노션을 쓰든 동일한 GUI를 사용할 수 있다.

상황

피자가게가 전세계로 나아가다 보니, 서로 쓰는 재료가 달라졌다.

그러다보니 같은 나라의 지점이라도 지점 별로 다른 원산지의 재료를 쓰고 있었다.

각 나라별로 원재료를 공급하는 공장을 만들어 피자의 품질을 올리자.

interface PizzaIngredientFactory {
    fun createDough(): Dough
    fun createSource(): Source
    fun createCheese(): Cheese
    fun createPepperoni(): Pepperoni
}

class NYPizzaIngredientFactory : PizzaIngredientFactory {
    override fun createDough(): Dough {
        return ThinCrustDough()
    }

    override fun createSource(): Source {
        return MarinaraSource()
    }

    override fun createCheese(): Cheese {
        return ReggianoCheese()
    }

    override fun createPepperoni(): Pepperoni {
        return SlicedPepperoni()
    }
}
  • 재료 공장을 만들어준다.

interface Pizza {
    var dough: Dough
    var source: Source
    var cheese: Cheese
    var pepperoni: Pepperroni
    
    fun prepare()
    fun bake()
    fun cut()
    fun box()
}

class PepperoniPizza(private val factory: PizzaIngredientFactory) : Pizza {
    override fun prepare() {
        dough = factory.createDough()
        source = factory.createSource()
        cheese = factory.createCheese()
        pepperoni = factory.createPepperoni()
    }

    override fun bake() {
        TODO("Not yet implemented")
    }

    override fun cut() {
        TODO("Not yet implemented")
    }

    override fun box() {
        TODO("Not yet implemented")
    }
}
  • 피자는 재료공장에서 재료를 받아 만들어진다.
  • 어떤 공장에서 오는지는 몰라도 된다.

class NYPizzaStore : PizzaStore() {
    override fun createPizza(type: String): Pizza? {
				val factory: PizzaIngredientFactory = NYPizzaIngredientFactory()
        return when(type) {
            "cheese" -> CheesePizza(factory)
            "pepperoni" -> PepperoniPizza(factory)
            "combination" -> CombinationPizza(factory)
            "potato" -> PotatoPizza(factory)
            else -> null
        }
    }
}

출처

https://refactoring.guru/ko/design-patterns/factory-method

https://refactoring.guru/ko/design-patterns/abstract-factory

https://ko.wikipedia.org/wiki/추상_팩토리_패턴


Uploaded by N2T

예시

abstract class Component {
    abstract fun operate(): String
}

class ConcreteComponent : Component() {
    override fun operate(): String {
        return "This is ConcreteComponent"
    }
}

abstract class Decorator(val component: Component) : Component() {
    abstract override fun operate(): String
}

class ConcreteDecorator(component: Component) : Decorator(component) {

    override fun operate(): String {
        return component.operate() + "with ConcreteDecorator"
    }
}

  • Client
fun main() {
    var concreteComponent: Component = ConcreteComponent()

    concreteComponent = ConcreteDecorator(concreteComponent)
    concreteComponent = ConcreteDecorator(concreteComponent)
    concreteComponent.operate()
}

개념

데코레이터 패턴은 이 객체를 사용하는 코드를 변경하지 않으면서 객체에 추가행동을 더해줄 수 있는 방법이다. 상속보다 유연하게 사용할 수 있다.

  • Component → 기본이 되는 개념 (음료)
  • ConcreteComponent → 개념을 구현한 구현체 (에스프레소)
  • Decorator → 장식의 틀
  • DecoratorComponent → 구현체의 장식 (우유, 휘핑크림)

비유

  • 카페
    • Component → 음료
    • ConcreteComponent → 에스프레소, 하우스 블렌드, 다크 로스트
    • DecoratorComponent → 모카, 우유, 두유, 휘핑
    abstract class Beverage {
        var description = "제목 없음"
        abstract fun cost(): Double
    }
    
    class Espresso : Beverage() {
        init {
            description = "에스프레소"
        }
        
        override fun cost(): Double {
            return 1.99
        }
    }
    
    class HouseBlend : Beverage() {
        init {
            description = "하우스 블렌드"
        }
    
        override fun cost(): Double {
            return 0.89
        }
    }
    
    abstract class CondimentDecorator(val beverage: Beverage) : Beverage() {
        abstract fun getDescription(): String
    }
    
    class Mocha(beverage: Beverage) : CondimentDecorator(beverage) {
        override fun getDescription(): String {
            return "${beverage.description}, 모카"
        }
    
        override fun cost(): Double {
            return beverage.cost() + 0.20
        }
    }
    
    class Whip(beverage: Beverage) : CondimentDecorator(beverage) {
        override fun getDescription(): String {
            return "${beverage.description}, 휘핑"
        }
    
        override fun cost(): Double {
            return beverage.cost() + 0.15
        }
    }
  • 안드로이드 Notification
    • Comonent → 알림
    • ConcreteComponent → 아이콘, 제목, 내용, PendingIntent 등이 지정되어있는 기본 Notification
    • DecoratorComponent → LagreIcon, BigPictureStyle 등등
    abstract class NotificationComponent {
        lateinit var notificationBuilder: NotificationCompat.Builder
        fun build() : Notification {
            return notificationBuilder.build()
        }
    
        abstract fun createNotificationBuilder(
            context: Context,
            pendingIntent: PendingIntent,
            title: String,
            body: String,
            channelId: String
        ): NotificationCompat.Builder
    }
    
    class BaseNotification: NotificationComponent() {
        override fun createNotificationBuilder(
            context: Context,
            pendingIntent: PendingIntent,
            title: String,
            body: String,
            channelId: String
        ): NotificationCompat.Builder {
    
            notificationBuilder =  NotificationCompat.Builder(context, channelId)
                .setSmallIcon(R.drawable.ic_launcher_transparent)
                .setColor(ContextCompat.getColor(context, R.color.icon_color))
                .setContentTitle(title)
                .setContentText(body)
                .setContentIntent(pendingIntent)
                .setAutoCancel(true)
                .setPriority(NotificationCompat.PRIORITY_HIGH)
                .setDefaults(NotificationCompat.DEFAULT_ALL)
            return notificationBuilder
        }
    }
    
    abstract class NotificationDecorator(val component: NotificationComponent): NotificationComponent()
    
    class LargeIconDecorator(component: NotificationComponent, private val largeIcon:Bitmap) : NotificationDecorator(component) {
        override fun createNotificationBuilder(
            context: Context,
            pendingIntent: PendingIntent,
            title: String,
            body: String,
            channelId: String
        ): NotificationCompat.Builder {
            notificationBuilder = component.createNotificationBuilder(context, pendingIntent, title, body, channelId)
                .setLargeIcon(largeIcon)
            return notificationBuilder
        }
    }
    
    class BigPictureDecorator(component: NotificationComponent, private val image: Bitmap) : NotificationDecorator(component) {
        override fun createNotificationBuilder(
            context: Context,
            pendingIntent: PendingIntent,
            title: String,
            body: String,
            channelId: String
        ): NotificationCompat.Builder {
            val bigPictureStyle = NotificationCompat.BigPictureStyle().also {
                it.setBigContentTitle(title)
                it.setSummaryText(body)
                it.bigPicture(image)
            }
    
            notificationBuilder = component.createNotificationBuilder(context, pendingIntent, title, body, channelId)
                .setStyle(bigPictureStyle)
    
            return notificationBuilder
        }
    }
    • 실제로 동작하는 코드입니다.
    • Caller 부분
      • Java
      NotificationComponent notification = new BaseNotification();
      notification = new LargeIconDecorator(notification, image);
      notification = new BigPictureDecorator(notification, image);
      notification.createNotificationBuilder(this, pendingIntent, title, body, CHANNEL_ID);
      
      notificationManager.notify(CHAT_NOTIFICATION_ID, notification.build());
      • Kotlin
      var notification: NotificationComponent = BaseNotification()
      notification = LargeIconDecorator(notification, image)
      notification = BigPictureDecorator(notification, image)
      notification.createNotificationBuilder(this, pendingIntent, title, body, CHANNEL_ID)
      
      notificationManager.notify(CHAT_NOTIFICATION_ID, notification.build())

장단점

장점

  • 서브클래스를 새로 만들지 않아도 객체의 행동을 추가할 수 있다.
  • 런타임에 행동을 추가할 수 있다.
  • SRP
    • 각 ConcreteDecorator가 하나의 책임을 가진다.

단점

  • 특정 데코레이터를 제거하기 어렵다.
  • 데코레이터의 순서에 의존한다.

이런 경우가 생길 수 있다.

출처

https://refactoring.guru/ko/design-patterns/decorator


Uploaded by N2T

+ Recent posts